Sunday, September 27, 2009

Baking Adventure #2

Fall is officially here, which means there are some amazingly delicious fruits and vegetables that are in their prime right now: apples, figs, pumpkins, squash, and BLUEBERRIES!!! (to name a few) Blueberries are extremely good for you as they are high in anti-oxidants, not to mention that they're absolutely delicious. Thus the reasoning behind my search for the best way to utilize their magnificentness. (In case you haven't noticed, I like to make up words.)

When searching for the recipe, I kept coming back to this Blueberry Tart recipe by Paula Deen. However, I have kind of been sweeted out lately and wanted to find something with blueberries as the star but a non-sweet/dessert. This was not an easy task until the other night my dad was having a conversation with a friend about how much he loved cornbread, but he also mentioned blueberry cornbread. Now, the "AH HA!" moment did not hit until about 5 days later while sitting at work to put two and two together, but I'm sure glad it did.

After doing some research online and reading through various recipes of simple cornbread and cornbread with jalapenos and cornbread stuffing, I finally found a blueberry cornbread recipe that struck my fancy. So without further ado, allow me to introduce this post's baking adventure...


As you can see from the link above, the recipe is pretty simple. There wasn't much prep beyond purchasing the ingredients and rinsing the blueberries. However, one thing to note when purchasing the Yellow Cornmeal for this recipe, make sure it is not the "mix". The "yellow cornmeal mix" already has baking soda, salt, and flour added. Your final product would be too salty and just a mess. Use "PLAIN" Yellow Cornmeal.
Now, the recipe states you can simply increase the amount of cornmeal to sub for not having masa flour. My grocery did in fact have masa flour, but the bag was as big as my head and I'm not baking for 200, so I opted to follow the side note about increasing Yellow Cornmeal.

Once the wet ingredients and dry ingredients have been mixed and blended in their corresponding bowls, it's time to stir them in together. Pretty simple! After fully saturating the dry ingredients in the wet, it was time to add the star ingredient: 1 cup of BLUEBERRIES!

HOWEVER, after gently folding in the blueberries to the cornbread mixture, I decided this was certainly not enough to make such a wonderful fruit stand out, so I dumped in the rest of the pint... What could go wrong right?


After greasing the 8"x8" square pan and pouring in the batter, it was time for the oven. Bake at 375 degrees for 20-25 min? Sure! No problem; I'll just clean up the kitchen while the DOUBLE blueberry cornbread bakes...

25 minutes later, I stick in the wooden skewer (ref. my Baking Adventure #1 post about wood vs. plastic or other materials)... and what do I find (much to my dismay)... the skewer comes out with batter on it, which means back in the oven to bake for a while longer!

After about 40-45 minutes of baking (checking every 5 min to see that it doesn't over bake), the skewer FINALLY comes out clean when placed in the middle of the blueberry cornbread.

Next, it's time to cool and relax, then enjoy!


THE END...


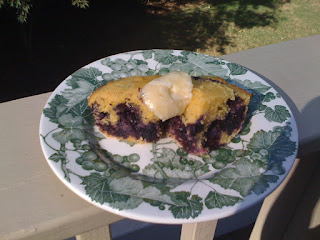
Or was it? After the cornbread cooled, I tasted a little sample and wasn't terribly pleased. The cornbread was decently moist but didn't exude much flavor or sweetness. (The recipe calls for 1/4 cup of sugar, which would leave one to believe it might be a sweeter cornbread... not so much.) Time to put my creative baking hat on and think... what goes well with warm cornbread? BUTTER... ok, got that... what is this double blueberry cornbread lacking? SUGAR... BY GEORGE I'VE GOT IT!!!

HONEY BUTTER!!! I returned to the grocery to buy some honey and got to work combining 1/2 stick of softened butter (aka 4 tablespoons or 1/4 cup) with 1 tablespoon of honey. After blending, the honey butter went back in the fridge to let it set. Let me tell you, I haven't had a more delicious butter in my life. (Secret: I always use salted butter even if the recipe calls for unsalted.)

After I found the magical solution to an otherwise mediocre Double Blueberry Cornbread, it was off to mom and dad's to surprise dad and see if it passed his stamp of approval. I warmed up the bread in the microwave and then topped it with the honey butter and served... DAD LOVED IT!!! I think he spoiled his dinner that mom would be cooking for us in a couple hours, but it was worth it. hehe


Ok, that's it for this baking adventure! Hope you have enjoyed! Not sure what the next one will be yet, possibly something with Figs as I've only eaten them a couple times raw and many times in Fig Newtons.

Friday, September 25, 2009

Next baking adventure has been determined!`


Stay tuned folks!

I've been going through recipes upon recipes the past week or so wanting to bake something with blueberries while trying to think outside the box and not do a dessert...
Last night it hit me! A convo with my dad about a week ago resurfaced in my brain, and I know exactly what I'll be making. Sorry to tease, but I must leave it as a surprise as my dad might be reading this and gotta keep you coming back right? :-) RIGHT!

Additional teaser: The blueberry, baked, non-dessert amazingness will be baked this weekend!!!

Saturday, September 12, 2009

Baking Adventure #1

On a daily basis I receive Recipe of the Day emails from Food Network, and this one immediately caught my eye. It just looked absolutely delectable. Sure, the level of difficulty read "Intermediate" and never had I made a bundt cake before (I have only made one cake in my life prior), BUT I love a good challenge and if the result tastes as good as it looks, than why not?


I began by gathering ingredients at my local grocery, which is conveniently next door. ;-) Mom let me borrow her pumpkin pie spice, but just about every other ingredient came from the store... this produced my first obstacle:

BUNDT Cake pan: The recipe calls for a 10-cup bundt cake pan. Ok, sure... no problem... NOT! If you're like me and have no previous knowledge of baking other than trial and error, then you would not be finding those words on anything in the baking aisle. However, there was a pan that resembled what I was looking for titled "Fluted Cake Pan". I called my mom to see if these were the same; she was no help as she's not a baker. Then, I pulled out my trusty pocket computer (aka iPhone) and googled it... low and behold, they're the SAME thing! The "fluted" part is just the shape of mold of the bundt cake pan. Evidently there are bundt cake pan molds shaped like flowers too... whodathunkit?!

Ok, back to the baking. Once all of ingredients were purchased, it was time to bake! First things first... PREP. You must prep all necessary ingredients before beginning the mixing and baking process.


For the cake the only labor-intensive prep necessary was the apples. The recipe calls for "peeling, coring, and roughly chopping" them. What's "roughly chopping" mean? Yea, I didn't know either so below is my stab at it.

Not too bad... basically I cut the apples into about 1/2 inch chunks.

After prepping the apples, I tossed them in the sugar and spice mix and then set to the side. Next I whisked together the wet ingredients in one bowl and the dry ingredients in another. The wet ingredients call for the zest of an orange. (Cool, since I had never zested anything before and didn't own a zester until an hour prior to this adventure.) It's pretty simple actually and kind of fun; it helps let out some aggression if you have any pent up. hehe.

TIP: Make sure, when zesting, that you only grate off the outside orange layer. Once you reach the more yellow part, move on. Use this tip when zesting any type of citrus.


Once everything was blended in its corresponding bowl, it was time to marry them together and layer into the bundt cake pan. The recipe called for place 1/2 cup of apples along the bottom of the pan first, but really you need about 1-1.5 cups. Then layer 1/3 of the batter, another 2 cups of apples, 1/3 batter, and 2 cups of apples, then the last 1/3 of the batter. Make sure you end with the batter. Also, it's a little sticky so you may need to use a spoon or spatula to spread it out evenly. That's it for the cake... after all ingredients are in the pan, it's BAKE TIME!

The recipe recommends baking the cake the night before that way all of the flavors and texture have a chance to fully develop. After an hour and 10 minutes, it's time to check the cake to see if it's done. I always use a wooden skewer or toothpick when testing my baking items. This is because if the batter is even remotely undercooked, then it will stick to the wood and you know to bake another minute or two or ten. [See below wooden skewer is clean of any batter aka time to pull from the oven!]


Once I pulled the cake from the oven, it was time to cool. I don't currently own a cooling rack so instead, I placed a piece of wax paper on a baking sheet and flipped (or "inverted" as the recipe says) the cake onto the baking sheet.


The cake then cooled over night at room temperature... aka I went and snuggled in bed after about 2 hours of labor. hehe. I'm like a little kid when it comes to baking for people. I can't wait to have them try it and see/hear their reactions! (Especially since I had been talking this cake up on facebook for the past 2 days) Given this personality trait, I awoke at 7am ready to finish, but it wasn't time yet. Cake delivery to my friends in family wasn't set to occur until 10am, so I went back to bed until 8:30am (this was a Saturday) then worked out and got to work on the final touch of the cake: the CARAMEL PECAN DRIZZLE topping.

First things first: PREP! The only prep for this was to toast the pecans. Being the avid Food Network television show watcher that I am have heard Giada de Laurentis say each time she toasted nuts that you can smell it when they're done. I used to think to myself "Ok, so if you can smell it, tell me what it's supposed to smell like." Well, ladies and gents... she's right! You really can smell it. The pecan scent began to permiate the kitchen when they were done toasting. The one thing they didn't do that I was expecting was to change color. The appearance stayed the same but they did get a little more crunchy and smelled delicious!

After the nuts are toasted, it's time to make the caramel, which I'd never done either. I don't even recall seeing it done on Food Network, so this was going to be an adventure! I mixed together and then swirled the sugar, corn syrup, and water while boiling like it said.


You're supposed to do this until it turns an amber brown color and it does! It's kind of cool the process of creating the caramel. I tried to get a picture but the camera and lighting didn't produce good enough results to show the pretty color. Once the sugar mixture turns amber, then I removed it from the heat and added the heavy cream. LESSON LEARNED: stir sugar mixture while adding heavy cream. I didn't stir it at first and paused b/c I didn't have the vanilla ready to go in and then it started clumping up. NOT A GOOD IDEA. However, with a lot of stirring, I was able to get it back to the consistency needed and add the pecans, then let the caramel sit and cool and thicken.


After the caramel cools some and thickens to a syrup consistency, it's time to pour on top of the cake. In order to ensure, even distribution of the amazing caramel pecan drizzle, I used a wooden spoon to scoop out the topping onto the cake. See FINAL result below! (There are two: one before taking to family and friends and one after they devoured half.)


See all of the apples loaded into the cake?

Alright, that's it for this cake. Time to take the second half to a football tailgate... Fall really is the best time of year!

Next baking adventure: Blueberry tart possibly? TBD!

Friday, September 11, 2009

Pint-Size Baker at your service!

First off, thank you for reading this blog. To be honest, I don't know how many people will actually read this thing, but hopefully it'll help someone else in this universe who loves to bake as much as I do or even someone who is baking for the first time and curious about what to expect. I intend to share each baking experience good and bad with you. We can laugh and cry together! Isn't that fun? haha!

I've found that baking is an excellent source of therapy. You get to "roughly chop", whisk, fold, and blend ingredients together and create something relatively in a matter of minutes. However, you're not just creating anything; you're creating a delicious piece of art that brings smiles to people's faces and produces a euphoric happiness when consumed... yes, this may be a little extreme, but think about that first bite of your favorite chocolate cake or oatmeal cookie... AHHHmazing!

As a little backgroud, the name "pint-size" came from a friend's husband who has called me "half pint" since the minute he met me. (Thanks Dan!) Little did he know back then how much the name pertained to my secret love of baking (and cooking but mostly baking). So here we go ladies and gents... the "Pint-Size Baker" is off and running!

First baking adventure: Caramel Apple Cake courtesy of Food Network