Monday, May 3, 2010

Baking Adventure #22


How many of you have heard of Lyme Disease? What do you know about it? Most people only know one thing: That it originates from ticks.

Some wonderful people have been banding together in support of Lyme Disease Awareness and have declared the month of May: Lyme Disease Awareness Month. In honor of this month, they have decided to paint May "Lyme" green and put together some amazing PSA ads. (You can view them here: http://www.youtube.com/user/lymenaide) If caught early enough, Lyme Disease can be treated pretty easily with antibiotics. However, sometimes the symptoms don't show up for months or even years and can ultimately lead to serious, long-term health problems.

Now, you're probably asking yourself why I have decided to partake in this cause. Aside from the fact that I love seeing younger generations banding together and making a difference, this particular cause hits close to home. An old friend of mine's sister has been battling Lyme disease for 3 years now. She is an absolutely beautiful girl and had the world at her fingertips when this horrible disease took its toll on her body and turned her world upside down. She is on the road to recovery but the battle hasn't been easy. (You can read more about Teri on John Raser's Causes page of his website: http://gospeedraser.com/causes/ and his blog: http://gospeedraser.com/golf-blog/)

I have never personally met Teri but I went to grade school with John, and through the world of the internet, we have been able to stay in touch. If Teri is anything like her brother, then this girl is beyond amazing, and my hope is for this blog post to raise awareness of the horrible disease that has affected their entire family.

So without further ado, it's time to paint the month of May Lyme with a scrumptious little baking adventure...


Key LYME Pie


I got this recipe from a website shown to me by a client. ThePioneerWoman.com has some incredible looking recipes and the Key Lime Pie was the first one I decided to make. The ingredients were minimal:


Then came time for some crust making. The recipe on the website calls for a food processor to turn the graham crackers into crumbs... well, I don't have one of these, so I crushed them the old fashioned way with a plastic ziplock bag and a heavy wooden mallet.

After the graham crackers were crumbled, it was time to add the sugar and melted butter.
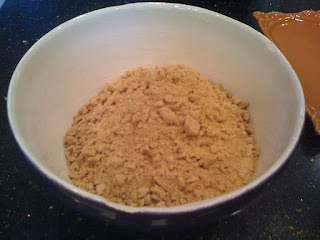
Press into the pie pan (ungreased).

And bake in the oven for about 5 minutes and let cool.

While the graham cracker pie crust was cooling, it was time to make the filling! I can't even begin to tell you how excited I was to find REAL key limes at the grocery! For never having even seen them in person nor knowing how much they would cost, I was a little worrisome. HOWEVER, my favorite grocery came to my rescue and they were only about $2-3 for an entire bag!

[Please notice the Key Limes are on the right and regular limes on the left.]

When first attempting to squeeze the juice out of the key limes (yes, squeeze by hand b/c I do not have a juicer... I seriously doubt these little boogers could fit in a juicer anyway), I only got three, maybe four, drops out of it...

The recipe called for 1/2 cup of key lime juice so that certainly wasn't going to work! After putting my thinking cap on [Elementary school throwback], I remembered the PERFECT kitchen utensil for crushing small things with little holes in it: my garlic crusher!!! It was a perfect fit and thus allowed for mega juicing of the key limes!

TIP: This recipe also calls for a large amount of key lime zest. Make sure you zest the limes prior to juicing.

Once the 1/2 cup of juice was obtained, I blended the 2 egg yolks, lime juice, lime zest, and can of sweetened condensed milk with my hand mixer.

Then poured into the prepared Graham Cracker crust.
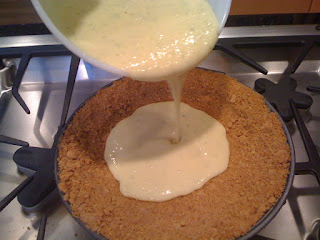
And baked in the oven for approximately 20 minutes. [The recipe says 15, but mine needed some extra time in the oven to make sure it was no longer "jiggly" in the middle.]

Once the Key Lyme Pie is baked, allow it to cool on the counter for about an hour and then pop in the fridge. I chose to let it chill in the fridge overnight because I love icebox pies EXTRA chilly, but to each their own.

Once cool enough, enjoy the Key Lime-y goodness. I guarantee you won't be able to just have one slice. There's something about the combination with the super tart key limes and the sweet graham cracker crust that just makes it irresistible.


***If you are interested in reading more about Lyme Disease or simply donating to or supporting the cause, below are two websites dedicated to the fight against Lyme Disease:
In addition to spreading awareness with this simple blog post, I will donate $0.50 for each person who comments on this blog post during the month of May to help the cause (up to $100). So please comment and feel free to donate or at the very least repost the above links to your friends and family! Together, we can help those affected by Lyme Disease.***

UPDATE: So this pie was SO good and such a hit that I decided to make another one for Cinco de Mayo. I changed the crust recipe slightly: used 16 graham crackers instead of 18. There was no overflowing mess of crumbs this time when pressing into the pie pan and it was equally as thick and delicious!


Thank you to everyone who has commented and reposted the link to this blog so far. The comments and stories are beyond humbling! Keep them coming! Together we can make a difference... EVERY LITTLE BIT HELPS!

Sunday, April 25, 2010

Baking Adventure #21

The weather in Atlanta lately has been amazing. Picture clear blue skies, a slight breeze, 78 degrees and sunshine from dawn until dusk. After all of the rain we had from fall through early spring, the nice weather has been a true blessing.

With that being said, we had a pretty gnarly storm come through and wash away all of the pollen late Friday night through late Saturday night. As a result, Saturday brought a day of errands and Lifetime movies on the couch (every girl loves to indulge in these from time to time, don't judge me). Since there was no avoiding the 100% chance of rain forecasted, an Avatar movie night was planned for the evening. Neither my friend nor I had seen it before and we decided to get creative and have a blue-theme to our snacks. He supplied blue corn tortilla chips and salsa, and I whipped up something yummy... *big surprise* Any excuse I can get to bake and be creative, I'll gladly take! What baked good went with the blue theme, you ask?


AVATAR BLUE(BERRY) CUPCAKES


Of course! I used a simple white cake mix purchased back in February at an Amish market in Ohio as my base. [This was cheating a little but I was baking at midnight Friday night, mind you, and felt like experimenting with additions and not the basic mix itself. Next time, the white cake will be derived from scratch as well.]

As part of my experimenting, I added fresh blueberries, a touch of lemon juice, and blue food coloring (to half of the cupcakes). Tip for folding in fresh blueberries: toss them in a little bit of flour to keep them from settling on the bottom of the batter prior to baking.

Once the batter was to my liking, I spooned it into the cupcake liners.

Then baked at 375 for approximately 15 minutes (or until the tops were firm) then let cool completely.

While the cupcakes were cooling, the experiment continued... Cream cheese frosting is my ABSOLUTE favorite of all the frostings, but I wanted this to also involve blueberries. So I made the frosting according to my usual recipe (cream cheese, butter, vanilla, and powdered sugar) then added the blueberries I had crushed... This sounds good in theory, no? Unfortunately, the resulting frosting was a bit runny (SERIOUSLY, runny frosting is becoming my arch-nemesis when it comes to baking!)... so I decided to wrap up the cupcakes and stick the frosting in the freezer overnight to firm up... Not the best idea. The next day (once the frosting thawed) it was back to its original consistency and just altogether not worthy of the "Pint-Size Baker" stamp of approval.

Thus, after a few choice words with myself [you know you talk to yourself too], I scraped the frosting off of the few cupcakes already frosted, dumped the entire bowl into the sink, and started over from scratch. Let me back up a little... after sticking the frosting in the freezer to set over night, I stayed up until 2am researching how to make frosting thicker. There aren't many tips for thickening cream cheese frosting; however, I did find a minor tweak suggestion and went to town on the new frosting and what do you know... IT WORKED! This batch ended up being my best yet in terms of consistency! Check out the final product below:


[Trying to improve my presentation skills... What do you think?]

And that's it for now folks! Baking Adventure #23 has already been determined but I need a #22 for next week. Please leave your recommendations in the comments section! I'll select one and bake it next week for you.


Friday, April 23, 2010

Baking Adventure #20

This post is going to be a little different than the norm, as baking adventure #20 was pretty much a failure both times I tried it.


Cinnamon Raisin Bread (minus the raisins)


My mom put in a special request for this a couple of weeks ago and I thought, "Sure! That should be easy. Afterall, I've made bread and cinnamon rolls before. What could be difficult about a little cinnamon bread minus the raisins?" WELL I am here to tell you that after two attempts at this pesky recipe, I have concluded two things: 1)Either my baking skills aren't what I thought they were or 2) This recipe is just plain incorrectly written (This is highly likely esp due to the fact that the recipe called for WAY too much salt to begin with. Who likes salty Cinnamon Raisin Bread? Not I!)...

[Reasons this failed: Bread never "rose" (Yes, my yeast was "alive") and it was too salty.]

Both options are entirely possible and while I have exhausted my attempts at this particular recipe I will NOT rest until I find another great cinnamon raisin bread recipe to try!

My sincerest apologies to those of you who have been checking in weekly if not more for the next baking adventure. You see, frustration gets the best of me sometimes and I wanted to remedy the errors of baking the bread before posting the recipe, so as to provide you with some great tips... Since that didn't happen, allow me to post a few pictures of something that DID turn out well:


DOUBLE-DECKER COOKIE CAKE!


For my friend Jason's birthday, he requested a cookie cake and stated that the frosting is the best part... so I took the idea and ran with it. Needless to say, there wasn't a crumb left upon leaving his celebration.


Note: If you would like me to make one of these for your birthday or any celebration, I would gladly oblige as new customers are always welcome!!! :-)

Wednesday, April 21, 2010

Oh where oh where can the Pint-Size Baker be?

Oh where or where can she be???

Sorry folks! I know I haven't blogged in a couple of weeks... I've still been baking and trying to conquer one particular recipe but it has given me so much trouble that I wanted to master it before blogging about it. Unfortunately, the mastering did not occur. *hmpf* [crosses arms and pokes bottom lip out]

Alas, there will be blogging to come in the next 24-48 hours though as I am in the process of finishing a double-decker chocolate chip cookie cake for a friends birthday!


STAY TUNED!

Monday, April 5, 2010

Baking Adventure #19

A day late posting this week's baking adventure but for good reason! Life has been INSANELY and AMAZINGLY busy the last week, so please excuse me if this post is misspelled (thank God for spellcheck), uses poor grammar, or is just plain bland. The recipe for this week's adventure was my grandmother's so I will try my best and do it good by providing an enthusiastic post!

This Easter season was filled with my confirmation into the Catholic church and great times with friends (new and old) and family, so it was only appropriate to celebrate the Easter holiday with a recipe from my grandmother, who is peacefully resting in heaven...


Strawberry Pie


If you notice from the specials in the produce section at the grocery, Strawberries, among other fruits, are very much in season right now! In fact, the grocery where I bought my ingredients for the recipe had 4 pints for $5! WOOHOO!

First things first: Prep...

[Insert picture that I forgot to take here. Please don't hate me. Mentally picture strawberries, strawberry gelatin, sugar, corn starch, and a Pillsbury pie shell (can't find a recipe that is better than premade).]

First, I baked the pie shell in the oven at 400 degrees for about 12 minutes like the pie shell packaging suggested. While it was cooling, I hauled and halved the strawberries...

Then layered them as neatly as possible into the baked pie shell.


Next, I combined the sugar, water, and corn starch in a pot over medium heat and stirred until thick. This took about 15-20 minutes of some TLC... TLC meaning stir and let sit for a minute or two, then stir and let sit again. Looking back, I probably should've let it get a little thicker, which is a takeaway for next time!

After the sugar starch was thick, I added the strawberry gelatin and red food coloring to make a gel and poured over the strawberries while still hot.


Another takeaway for next time: buy a DEEP DISH pie shell!!!... Strawberry goop kind of overflowed... and by kind of, I mean there was strawberry yumminess all over the counters! So much so that I had to place the pie on a pizza pan while it set in the fridge.


After the pie set for a few hours, I made some homemade whipped cream (*as grandma smiles down from heaven*) with heavy cream, powdered sugar, and a touch of vanilla!

Please note that homemade whipped cream doesn't save well, so prepare it right before serving. It was the perfect addition to an amazing Strawberry Pie! There are requests already to make it again soon. It's looking like a few great people at church are going to be getting this the next time as well!


[The pie crust was no match for the strawberries' strength but if you look hard enough you can find the little guy under there somewhere.]

Hope you all had an amazing Easter holiday and were able to celebrate with those near and dear to your heart!

Oh, before I forget! I made some cookies too as a "thank you" to some people at church for their amazing help and support throughout the RCIA process. Check out the little goodie bags:


Until next time my friends! Muah!

Sunday, March 28, 2010

Baking Adventure #18

Hey hey hey! Sorry to have missed you last week, but the weekend was too busy for baking. SAD... I know. :-( HOWEVER, this weekend more than made up for it. This week's baking adventure came about as a request from my one and only repeat customer (thus far...). He has purchased Snickerdoodles in the past and has more faith in my baking than I do! This week's baking adventure is...


BANANA BREAD (or 'Nanner Bread as I like to call it!)


My friend is a huge fan of this bread, but he prefers it without nuts... [I don't discriminate personally]. After his request was placed, I set out to find the PERFECT recipe so as not to disappoint a paying customer. Upon referencing my usual sources, I stumbled upon this recipe from a bakery in Boston called Flour Bakery + Cafe. Bobby Flay did a THROWDOWN with the owner of this bakery for her Sticky Buns, so after reading all of the praises on the reviews tab for the recipe, I knew I had found THE perfect banana bread. [Although, if you know me well enough by now, you know I have to tweak it just a smidge to give it that extra Pint-Size Baker lovin']

First things first was PREP.

[Additional "tweak" ingredients not pictured.]

Then came separating the dry and wet ingredients...

This recipe was beyond simple to make in terms of steps. The most difficult step was maintaining the endurance to whisk the eggs and sugar together for 10 minutes straight by hand (sure, I could've pulled out the hand-mixer, but what's the fun in that???).

Once the eggs and sugar were creamed together, it was time to add the smashed bananas, sour cream (couldn't find creme fraiche at my standard grocery), and vanilla extract. [Oh, I forgot to mention! My paying customer requested TWO loaves, so everything was doubled to compensate.]

Then it was time to blend the dry ingredients in with the wet ingredients.

Pour the batter into the wax paper-lined loaf pans.

And bake in the oven for about an hour at 350 degrees.

Once the Banana Bread loaves were cool, I delivered them to the customer and he was beyond ecstatic! [If you're his friend on facebook, you will see him bragging about having the "goods" when no one else does. haha!]


The End.


Or was it? Yea, not so much... My paying customer bragged SO much about the bread that my parents were giving me the stink-eye when they realized they didn't have any waiting at home for them. And so it was back to the grocery to pick up some more 'nanners and make them their own loaf as well! See? I told you, this weekend MORE than made up for the lack of baking last weekend. 3 loaves of Banana Bread + Lunch cooked for the week = a sleepy Pint-Size Baker.

Thanks to Food Network for posting the AMAZING recipe from Flour Bakery + Cafe on their website and thanks to Flour for sharing it! If I ever get to visit Boston like I'm hoping, I fully plan on going there and trying the real thing for myself!

Until next time peeps, have a wonderful week! This one is going to be a busy one with Easter on Sunday but have no fear, baking will ensue and it's sure not to disappoint!

Sunday, March 14, 2010

Baking Adventure #17

Luck #17??? It is if it's March 17th... St. Patrick's Day!

This week's baking adventure is purely inspired by this wonderful little holiday. Ever since I was little [insert pint-sized joke here], I have been excited when March 17th comes around. From the shamrocks to rainbows and leprechauns [Did anyone else make leprechaun traps out of shoe boxes???] to green-colored everything, it's just a super-fun holiday all-around. Now that I'm adult, the holiday has some additional perks in the form of alcoholic beverages. With that being said, time to announce this week's baking adventure...


IRISH CUPCAKES
(Chocolate Stout Cupcakes with Bailey's Irish Cream Frosting)


Due to the awesomeness that is this recipe and the holiday it's paired with, I decided that it would be imperative to document the baking via video. It's the best way to soak in the joy this holiday brings to me (and hopefully you!). Please see below for parts 1 and 2 of the Irish Cupcakes baking adventure. [Should you choose to forgo the videos, keep scrolling. There is a shortened regular blog-post for your viewing pleasure!]


First things first, PREP! [Can you spot the "adult" additions to the ingredients list? ;-) ]

Next it was time to combine the wet and dry ingredients in their respective bowls. This is where a couple of slight problems occurred... SOMEONE (me) forgot to add the 2 cups of sugar until after the dry ingredients were whisked together AND she forgot to melt the butter before combining with the beer and had to backtrack. Thank goodness, these mistakes were caught early on and didn't impact the outcome of the chocolate stout cupcakes!

After the imperfections were repaired, the wet and dry ingredients were combined 1/3 at a time to make the cupcake batter. Make sure you're adding the dry into the wet and NOT vice-versa when combining the two.

Once the batter is combined, scoop the batter with an ice cream scooper into the prepared, lined muffin pan. Now, if you're like me and don't have an ice cream scooper on hand, feel free to use the Tablespoon measuring utensil. [See above] It works almost as well!

The cupcakes baked for about 20 minutes at 350 degrees. HINT: Make sure when baking cupcakes, you give them ample time to cool! Otherwise, you will have a big melty mess when trying to frost them. While the cupcakes are cooling is the perfect time to prepare the frosting! The Food Network recipe for the Chocolate Stout Cupcakes called for a variation on Cream Cheese Frosting, but nothing out of the norm... so as I usually like to do, I made a few tweaks to give it some extra Irish/St. Patrick's Day flare!

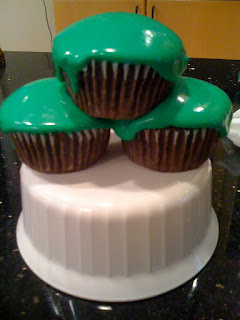
I reduced the heavy cream down to 1/2 c and added 3 tbsp of Bailey's Irish Cream to the mix. ALSO, I went ahead and added a tablespoon of green food coloring. You just can't have St. Patrick's Day without green food coloring in everything! Below is the final product!

My little Leprechaun friend had to join in on the baking and bring some luck along the way. However, I will tell you... I think he fell asleep on the job because the frosting consistency wasn't my best. It was way too runny, even after setting overnight in the fridge. Next time, I will only use 1/4 c of heavy cream OR just make my standard cream cheese frosting recipe with cream cheese and butter.

Regardless, the cupcakes turned out SUPER moist and "magically delicious"! Thanks so much for tuning in to this week's baking adventure. Hope you have a great St. Patrick's Day and before I go, here's a little Irish Blessing just for you...


Until next time!

Pint-Size Baker