Showing posts with label cupcakes. Show all posts

Sunday, April 25, 2010

Baking Adventure #21

The weather in Atlanta lately has been amazing. Picture clear blue skies, a slight breeze, 78 degrees and sunshine from dawn until dusk. After all of the rain we had from fall through early spring, the nice weather has been a true blessing.

With that being said, we had a pretty gnarly storm come through and wash away all of the pollen late Friday night through late Saturday night. As a result, Saturday brought a day of errands and Lifetime movies on the couch (every girl loves to indulge in these from time to time, don't judge me). Since there was no avoiding the 100% chance of rain forecasted, an Avatar movie night was planned for the evening. Neither my friend nor I had seen it before and we decided to get creative and have a blue-theme to our snacks. He supplied blue corn tortilla chips and salsa, and I whipped up something yummy... *big surprise* Any excuse I can get to bake and be creative, I'll gladly take! What baked good went with the blue theme, you ask?


AVATAR BLUE(BERRY) CUPCAKES


Of course! I used a simple white cake mix purchased back in February at an Amish market in Ohio as my base. [This was cheating a little but I was baking at midnight Friday night, mind you, and felt like experimenting with additions and not the basic mix itself. Next time, the white cake will be derived from scratch as well.]

As part of my experimenting, I added fresh blueberries, a touch of lemon juice, and blue food coloring (to half of the cupcakes). Tip for folding in fresh blueberries: toss them in a little bit of flour to keep them from settling on the bottom of the batter prior to baking.

Once the batter was to my liking, I spooned it into the cupcake liners.

Then baked at 375 for approximately 15 minutes (or until the tops were firm) then let cool completely.

While the cupcakes were cooling, the experiment continued... Cream cheese frosting is my ABSOLUTE favorite of all the frostings, but I wanted this to also involve blueberries. So I made the frosting according to my usual recipe (cream cheese, butter, vanilla, and powdered sugar) then added the blueberries I had crushed... This sounds good in theory, no? Unfortunately, the resulting frosting was a bit runny (SERIOUSLY, runny frosting is becoming my arch-nemesis when it comes to baking!)... so I decided to wrap up the cupcakes and stick the frosting in the freezer overnight to firm up... Not the best idea. The next day (once the frosting thawed) it was back to its original consistency and just altogether not worthy of the "Pint-Size Baker" stamp of approval.

Thus, after a few choice words with myself [you know you talk to yourself too], I scraped the frosting off of the few cupcakes already frosted, dumped the entire bowl into the sink, and started over from scratch. Let me back up a little... after sticking the frosting in the freezer to set over night, I stayed up until 2am researching how to make frosting thicker. There aren't many tips for thickening cream cheese frosting; however, I did find a minor tweak suggestion and went to town on the new frosting and what do you know... IT WORKED! This batch ended up being my best yet in terms of consistency! Check out the final product below:


[Trying to improve my presentation skills... What do you think?]

And that's it for now folks! Baking Adventure #23 has already been determined but I need a #22 for next week. Please leave your recommendations in the comments section! I'll select one and bake it next week for you.


Sunday, March 14, 2010

Baking Adventure #17

Luck #17??? It is if it's March 17th... St. Patrick's Day!

This week's baking adventure is purely inspired by this wonderful little holiday. Ever since I was little [insert pint-sized joke here], I have been excited when March 17th comes around. From the shamrocks to rainbows and leprechauns [Did anyone else make leprechaun traps out of shoe boxes???] to green-colored everything, it's just a super-fun holiday all-around. Now that I'm adult, the holiday has some additional perks in the form of alcoholic beverages. With that being said, time to announce this week's baking adventure...


IRISH CUPCAKES
(Chocolate Stout Cupcakes with Bailey's Irish Cream Frosting)


Due to the awesomeness that is this recipe and the holiday it's paired with, I decided that it would be imperative to document the baking via video. It's the best way to soak in the joy this holiday brings to me (and hopefully you!). Please see below for parts 1 and 2 of the Irish Cupcakes baking adventure. [Should you choose to forgo the videos, keep scrolling. There is a shortened regular blog-post for your viewing pleasure!]


First things first, PREP! [Can you spot the "adult" additions to the ingredients list? ;-) ]

Next it was time to combine the wet and dry ingredients in their respective bowls. This is where a couple of slight problems occurred... SOMEONE (me) forgot to add the 2 cups of sugar until after the dry ingredients were whisked together AND she forgot to melt the butter before combining with the beer and had to backtrack. Thank goodness, these mistakes were caught early on and didn't impact the outcome of the chocolate stout cupcakes!

After the imperfections were repaired, the wet and dry ingredients were combined 1/3 at a time to make the cupcake batter. Make sure you're adding the dry into the wet and NOT vice-versa when combining the two.

Once the batter is combined, scoop the batter with an ice cream scooper into the prepared, lined muffin pan. Now, if you're like me and don't have an ice cream scooper on hand, feel free to use the Tablespoon measuring utensil. [See above] It works almost as well!

The cupcakes baked for about 20 minutes at 350 degrees. HINT: Make sure when baking cupcakes, you give them ample time to cool! Otherwise, you will have a big melty mess when trying to frost them. While the cupcakes are cooling is the perfect time to prepare the frosting! The Food Network recipe for the Chocolate Stout Cupcakes called for a variation on Cream Cheese Frosting, but nothing out of the norm... so as I usually like to do, I made a few tweaks to give it some extra Irish/St. Patrick's Day flare!

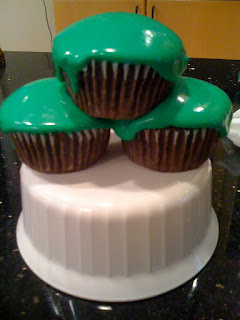
I reduced the heavy cream down to 1/2 c and added 3 tbsp of Bailey's Irish Cream to the mix. ALSO, I went ahead and added a tablespoon of green food coloring. You just can't have St. Patrick's Day without green food coloring in everything! Below is the final product!

My little Leprechaun friend had to join in on the baking and bring some luck along the way. However, I will tell you... I think he fell asleep on the job because the frosting consistency wasn't my best. It was way too runny, even after setting overnight in the fridge. Next time, I will only use 1/4 c of heavy cream OR just make my standard cream cheese frosting recipe with cream cheese and butter.

Regardless, the cupcakes turned out SUPER moist and "magically delicious"! Thanks so much for tuning in to this week's baking adventure. Hope you have a great St. Patrick's Day and before I go, here's a little Irish Blessing just for you...


Until next time!

Pint-Size Baker

Sunday, January 24, 2010

Baking Adventure #13

Lucky #13?

For this week's baking adventure I wanted to do something creative, something a little challenging if you will. At first I stumbled upon this Better Than Banana Cream Pie Cupcakerecipe. It sounded delicious and definitely a little challenging, but I'm not a huge fan of whipped cream (see frosting portion of recipe) and it didn't quit provide the type of challenge I was looking for. You see, I wanted to learn a new technique. So then I continued researching cupcake recipes while bookmarking the Banana Cream Pie one. I came across one for a Chocolate Chip Cupcake with Chocolate Chip Frosting. This is one I had been eyeing for a few months now, but never actually gave in and made it... Then, it HIT me! One of my dad's favorite flavors of ice cream is Bruster's Banana Chocolate Chip... What if I combined the two recipes and then transformed into my own and made a Banana + Chocolate Chip concoction?!... [Spoken in an English accent] BY GEORGE I THINK I'VE GOT IT! This week's baking adventure then came to life:


BANANA CHOCO CHIP CUPCAKES


I began this recipe just like any other by taking a trip to the grocery and prepping everything before beginning. (This is a great technique so you don't get half way through and realize you screwed up... STAY TUNED, the Pint-Size Baker = minor FAIL on this adventure)

After prepping the ingredients, including mashing two bananas, I began referencing the Better Than Banana Cream Pie Cupcake recipe for the base of my cupcake.


However, I made a few slight changes:
  1. Instead of buying light brown sugar, I used the dark brown already on hand.
  2. Added 1/4 tsp of banana extract
  3. Substituted 1/4 c semi-sweet chocolate chips for walnuts
  4. Salted butter instead of unsalted (I have NEVER used unsalted butter.)
  5. Halved the recipe entirely... well almost...
Once the dry ingredients and wet ingredients were combined in their respective bowls I began combining 1/3 at a time... then all of a sudden I felt like I got hit in the head with a ton of bricks and an overwhelmed sense of anger and frustration hit me... I had halved every single ingredient up until the eggs and vanilla. UGH! So either I was going to have to dump the 1/3 of dry and wet ingredients combined out and start over OR I was going to have to figure out how to double the rest of the ingredients and make the normal batch. The latter was my first choice until I realized I had only bought enough bananas to make half a batch...

To the trash can we went! But not before taking a sad face picture:

And back to the drawing board with the wet ingredients and adding another 1/3 of dry ingredients back to its bowl. (This is where my mathematical brain came in great handy!) I must confess though that I was a little (read: a lot) irritated at myself for making such a stupid mistake and thank goodness no one else was around to see how upset at myself I was... However, that was when I turned on some good cooking music (country) and went to town. Eventually the bad mood fell by the wayside, and the baking was back in business!


(Note: This is a thicker than normal batter.)

The cupcake pans were lined and batter filled.

While the cupcakes cooled, it was time to start on the frosting.


Otherwise known as: THE CHALLENGE. This frosting was different from my norm in that it was buttercream made from scratch. I referenced this Basic Buttercream recipe as my base and went to town. If anyone has made buttercream before or anyone does it more than once in a lifetime, I commend you! This was NOT an easy feat. Leave it to me to not read how long you actually have to beat the butter and sugar until it becomes the wonder known as buttercream frosting! But boy is it worth it!

Lessons learned from making buttercream frosting:
  1. 1980s hand-mixer motors aren't cut out for 30+ minutes of use. Seriously thought it was going to catch fire.
  2. Read directions prior to beginning. LUCKILY, I only made half the batch (yes, I remembered to half EVERYTHING this time) so it only took about 25 minutes to get the buttercream frosting just right.
Once the Basic Buttercream Frosting was to the consistency it needed to be, I substituted banana extract for the vanilla and spread on top of the cooled cupcakes. To get a little creative, I made a quick chocolate ganache. (Recipe: melt 1/4 c semi-sweet chocolate chips and 1/4 c heavy whipping cream in the microwave on high for about 30 seconds. Remove and stir until creamy.) Then poured the ganache on top of the frosted cupcakes and VOILA!


There you have it! Banana Choco Chip Cupcakes! Hope you enjoyed this week's installment of the Pint-Size Baking Adventures. Be sure to leave any questions below as this recipe was certainly an experiment!

Sunday, October 11, 2009

Baking Adventure #4

This week's baking adventure is dedicated to one of my dearest and best friends in the world, Meredith!

We met way back when in 6th grade and neither distance nor time has keep us apart. She is one of those rare friends who you can go years without much communication, and then it will seem like no time has passed when reconnecting. (However, don't steal her napkin or she'll get mad at you for entire day! hehe) We both share a pet peeve for bad grammar, the desire to be as healthy as possible while still enjoying amazing food, love for good family, and most importantly... a PASSION FOR BAKING!

Meredith is an amazing decorator! I, however, am not. I prefer the more rustic baked goods as my patience for decorating is minimal. Meredith has an amazing talent that's only just begun, but her modest self would tell you otherwise... You be the judge:

[Elmo cake picture courtesy of a facebook album of hers. Hope you don't mind!]

Due to the purpose behind my passion for baking being the joy it brings to people, it seems only appropriate to dedicate this blog to her, our friendship, the joy she brings to my life, and her amazing recipe for...


HUMMINGBIRD CUPCAKES!!!

This week's baking adventure is Meredith's version for Hummingbird Cupcakes. Typically, this recipe calls for a good bit of sugar and is on the unhealthy side. However, Meredith, the baking genius she is, made a healthier version that's just as delicious and not overly sweet.

What's a Hummingbird Cupcake you ask? It includes banana and pineapple in the cake batter and a (reduced fat) cream cheese frosting. Upon researching the reasoning behind the name for this cake, I came across some interesting symbolism behind and facts about Hummingbirds that coincide with our friendship as well as the way we both view life.

Pulled from http://symbolism.wikia.com, the Hummingbird is "a symbol of love, joy, and beauty. The Hummingbird is also able to fly backwards, teaching us that we can look back on our past. But, this bird also teaches that we must not dwell on our past; we need to move forward. When the hummingbird hovers over flowers while drinking nectar, we learn that we should savor each moment, and appreciate the things we love."

Everything happens for a reason, and our past shapes who we are today. Today is a gift, that's why it's called the present. Your friendship is a gift to me Meredith, and I'm so glad to have you in my life after all these years! This recipe is beyond appropriate and so let's begin the adventure...

First things first, Prep!


Next it was time to combine the dry and wet ingredients in their respective bowls and then blend together. Typically, I whisk and stir everything by hand. However, I pulled out an electric hand mixer given to me by an old friend (Thanks Carrie O!) to help speed up the process of the cupcakes. (TIP: If using an electric hand mixer, make sure you twist the bowl 360 degrees a few times while mixing in order to blend the ingredients completely.)

After the wet and dry ingredients were combined, it was time to fold in the smashed banana, crushed pineapple and some cinnamon. (Side note: I halved this recipe as I was just baking for the sake of the adventure and not for a party. It typically makes around 15-20 regular size cupcakes.)

After folding in the banana and pineapple, I spooned the batter into lined cups of the mini muffin pan. (Mini muffin sizes make it easier to share with lots of people!) If you want the cupcakes to puff up over the sides a bit, fill the cup liner up to about 7/8 of the liner itself. I highly recommend this as it creates a great shelf for holding the icing once the cupcakes have cooled.

While the cupcakes are baking in the oven, it's time to make the frosting! For me this is the best part of any cake or cupcake, and I judge baked goods based on the frosting alone if they call for it, i.e. birthday cake. If the frosting is subpar, then chances are I will not eat the cake part either. Yea, yea... maybe I'm a little judgmental but come on! Who doesn't agree that frosting is the best part?

{This is what happens when you neglect to lock the whisks into place in the electric mixer. Oopsy!}
After the frosting was prepared and the second batch of cupcakes were in the oven (I only have one mini muffin pan, so it took 4 batches to get all of the batter baked.), I began to ponder how to make the Hummingbird cupcakes a little more fun, if you will. Sure, they're going to be delicious, but we eat with our eyes first before with our mouths. The frosting was white and so were the cupcakes themselves, and to me, white on white just is a little boring. So I had an "AH HA!" moment and decided to go get some food coloring. However, I still had another batch to bake. Well, this is the adventure part...

While the 4rd and final batch was in the oven, I SPRINTED down the elevator, out the doors of my building, across the parking lot of the grocery, down the baking aisle, grabbed the food coloring, ran to the checkout (where someone yelled "RUN FOREST RUN!" to me), paid, and ran back through the parking lot, through the doors of the building, back up the elevator, and back home. Yea, I know you're never supposed to leave the oven unattended... but shhh, just don't tell anyone k? It'll be our little secret AND I arrived with about 5 minutes to spare left in the baking.

Once I got the proper coloring in the frosting (I went with orange), it was time to frost the cooled cupcakes. This is when the pretty simple cupcake recipe road turned a little curvy and bumpy. As a result of my hot kitchen (lots of heat + small areas = hot kitchen... need a better ventilation system) and the thinner frosting resulting from the food coloring, I had a bit of a mess upon piping onto the cupcakes and had to stick them in the freezer/fridge to set. These weren't the prettiest of my creations, but they were quite tasty!


After the cupcakes were baked and frosted, I was off to my first group of taste testers: the Buckhead Cigar Club family. While there, I got my second request for more Snickerdoodles and a glass of wine in trade for a cupcake! I'd say this baking adventure was a success!!!

Thanks so much Meredith for the recipe and your amazing unconditional friendship and love throughout the years! I cannot wait for N&T to become a reality!

That's it for this baking adventure! If you're curious as to the recipe, please let me know (comment section below) and I will check with Meredith and see if sharing is allowed. If not, you can always place a request in the comment section below as well and I'd gladly bake you some! ;-)

...Until the next baking adventure folks!