Monday, April 5, 2010

Baking Adventure #19

A day late posting this week's baking adventure but for good reason! Life has been INSANELY and AMAZINGLY busy the last week, so please excuse me if this post is misspelled (thank God for spellcheck), uses poor grammar, or is just plain bland. The recipe for this week's adventure was my grandmother's so I will try my best and do it good by providing an enthusiastic post!

This Easter season was filled with my confirmation into the Catholic church and great times with friends (new and old) and family, so it was only appropriate to celebrate the Easter holiday with a recipe from my grandmother, who is peacefully resting in heaven...


Strawberry Pie


If you notice from the specials in the produce section at the grocery, Strawberries, among other fruits, are very much in season right now! In fact, the grocery where I bought my ingredients for the recipe had 4 pints for $5! WOOHOO!

First things first: Prep...

[Insert picture that I forgot to take here. Please don't hate me. Mentally picture strawberries, strawberry gelatin, sugar, corn starch, and a Pillsbury pie shell (can't find a recipe that is better than premade).]

First, I baked the pie shell in the oven at 400 degrees for about 12 minutes like the pie shell packaging suggested. While it was cooling, I hauled and halved the strawberries...

Then layered them as neatly as possible into the baked pie shell.


Next, I combined the sugar, water, and corn starch in a pot over medium heat and stirred until thick. This took about 15-20 minutes of some TLC... TLC meaning stir and let sit for a minute or two, then stir and let sit again. Looking back, I probably should've let it get a little thicker, which is a takeaway for next time!

After the sugar starch was thick, I added the strawberry gelatin and red food coloring to make a gel and poured over the strawberries while still hot.


Another takeaway for next time: buy a DEEP DISH pie shell!!!... Strawberry goop kind of overflowed... and by kind of, I mean there was strawberry yumminess all over the counters! So much so that I had to place the pie on a pizza pan while it set in the fridge.


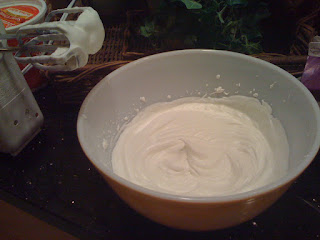
After the pie set for a few hours, I made some homemade whipped cream (*as grandma smiles down from heaven*) with heavy cream, powdered sugar, and a touch of vanilla!

Please note that homemade whipped cream doesn't save well, so prepare it right before serving. It was the perfect addition to an amazing Strawberry Pie! There are requests already to make it again soon. It's looking like a few great people at church are going to be getting this the next time as well!


[The pie crust was no match for the strawberries' strength but if you look hard enough you can find the little guy under there somewhere.]

Hope you all had an amazing Easter holiday and were able to celebrate with those near and dear to your heart!

Oh, before I forget! I made some cookies too as a "thank you" to some people at church for their amazing help and support throughout the RCIA process. Check out the little goodie bags:


Until next time my friends! Muah!

Sunday, March 28, 2010

Baking Adventure #18

Hey hey hey! Sorry to have missed you last week, but the weekend was too busy for baking. SAD... I know. :-( HOWEVER, this weekend more than made up for it. This week's baking adventure came about as a request from my one and only repeat customer (thus far...). He has purchased Snickerdoodles in the past and has more faith in my baking than I do! This week's baking adventure is...


BANANA BREAD (or 'Nanner Bread as I like to call it!)


My friend is a huge fan of this bread, but he prefers it without nuts... [I don't discriminate personally]. After his request was placed, I set out to find the PERFECT recipe so as not to disappoint a paying customer. Upon referencing my usual sources, I stumbled upon this recipe from a bakery in Boston called Flour Bakery + Cafe. Bobby Flay did a THROWDOWN with the owner of this bakery for her Sticky Buns, so after reading all of the praises on the reviews tab for the recipe, I knew I had found THE perfect banana bread. [Although, if you know me well enough by now, you know I have to tweak it just a smidge to give it that extra Pint-Size Baker lovin']

First things first was PREP.

[Additional "tweak" ingredients not pictured.]

Then came separating the dry and wet ingredients...

This recipe was beyond simple to make in terms of steps. The most difficult step was maintaining the endurance to whisk the eggs and sugar together for 10 minutes straight by hand (sure, I could've pulled out the hand-mixer, but what's the fun in that???).

Once the eggs and sugar were creamed together, it was time to add the smashed bananas, sour cream (couldn't find creme fraiche at my standard grocery), and vanilla extract. [Oh, I forgot to mention! My paying customer requested TWO loaves, so everything was doubled to compensate.]

Then it was time to blend the dry ingredients in with the wet ingredients.

Pour the batter into the wax paper-lined loaf pans.

And bake in the oven for about an hour at 350 degrees.

Once the Banana Bread loaves were cool, I delivered them to the customer and he was beyond ecstatic! [If you're his friend on facebook, you will see him bragging about having the "goods" when no one else does. haha!]


The End.


Or was it? Yea, not so much... My paying customer bragged SO much about the bread that my parents were giving me the stink-eye when they realized they didn't have any waiting at home for them. And so it was back to the grocery to pick up some more 'nanners and make them their own loaf as well! See? I told you, this weekend MORE than made up for the lack of baking last weekend. 3 loaves of Banana Bread + Lunch cooked for the week = a sleepy Pint-Size Baker.

Thanks to Food Network for posting the AMAZING recipe from Flour Bakery + Cafe on their website and thanks to Flour for sharing it! If I ever get to visit Boston like I'm hoping, I fully plan on going there and trying the real thing for myself!

Until next time peeps, have a wonderful week! This one is going to be a busy one with Easter on Sunday but have no fear, baking will ensue and it's sure not to disappoint!

Sunday, March 14, 2010

Baking Adventure #17

Luck #17??? It is if it's March 17th... St. Patrick's Day!

This week's baking adventure is purely inspired by this wonderful little holiday. Ever since I was little [insert pint-sized joke here], I have been excited when March 17th comes around. From the shamrocks to rainbows and leprechauns [Did anyone else make leprechaun traps out of shoe boxes???] to green-colored everything, it's just a super-fun holiday all-around. Now that I'm adult, the holiday has some additional perks in the form of alcoholic beverages. With that being said, time to announce this week's baking adventure...


IRISH CUPCAKES
(Chocolate Stout Cupcakes with Bailey's Irish Cream Frosting)


Due to the awesomeness that is this recipe and the holiday it's paired with, I decided that it would be imperative to document the baking via video. It's the best way to soak in the joy this holiday brings to me (and hopefully you!). Please see below for parts 1 and 2 of the Irish Cupcakes baking adventure. [Should you choose to forgo the videos, keep scrolling. There is a shortened regular blog-post for your viewing pleasure!]


First things first, PREP! [Can you spot the "adult" additions to the ingredients list? ;-) ]

Next it was time to combine the wet and dry ingredients in their respective bowls. This is where a couple of slight problems occurred... SOMEONE (me) forgot to add the 2 cups of sugar until after the dry ingredients were whisked together AND she forgot to melt the butter before combining with the beer and had to backtrack. Thank goodness, these mistakes were caught early on and didn't impact the outcome of the chocolate stout cupcakes!

After the imperfections were repaired, the wet and dry ingredients were combined 1/3 at a time to make the cupcake batter. Make sure you're adding the dry into the wet and NOT vice-versa when combining the two.

Once the batter is combined, scoop the batter with an ice cream scooper into the prepared, lined muffin pan. Now, if you're like me and don't have an ice cream scooper on hand, feel free to use the Tablespoon measuring utensil. [See above] It works almost as well!

The cupcakes baked for about 20 minutes at 350 degrees. HINT: Make sure when baking cupcakes, you give them ample time to cool! Otherwise, you will have a big melty mess when trying to frost them. While the cupcakes are cooling is the perfect time to prepare the frosting! The Food Network recipe for the Chocolate Stout Cupcakes called for a variation on Cream Cheese Frosting, but nothing out of the norm... so as I usually like to do, I made a few tweaks to give it some extra Irish/St. Patrick's Day flare!

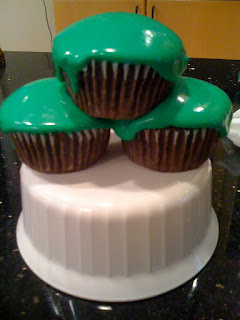
I reduced the heavy cream down to 1/2 c and added 3 tbsp of Bailey's Irish Cream to the mix. ALSO, I went ahead and added a tablespoon of green food coloring. You just can't have St. Patrick's Day without green food coloring in everything! Below is the final product!

My little Leprechaun friend had to join in on the baking and bring some luck along the way. However, I will tell you... I think he fell asleep on the job because the frosting consistency wasn't my best. It was way too runny, even after setting overnight in the fridge. Next time, I will only use 1/4 c of heavy cream OR just make my standard cream cheese frosting recipe with cream cheese and butter.

Regardless, the cupcakes turned out SUPER moist and "magically delicious"! Thanks so much for tuning in to this week's baking adventure. Hope you have a great St. Patrick's Day and before I go, here's a little Irish Blessing just for you...


Until next time!

Pint-Size Baker

Sunday, March 7, 2010

Baking Adventure #16

Standard weekly baking adventure aside, this week has been quite the adventure in and of itself! It has been filled with impromptu chocolate chip cookie baking in a foreign kitchen (aka not my own), randomly winning tickets to a country music concert and attending said concert 24 hrs later(Jimmie Jam 2010 featuring Luke Bryan), and seeing myself on the news!!!

Remember back in January when I said I was going after a dream? Well, I went to a casting call for a new Gordon Ramsey cooking show called MasterChef, where they take amateur cooks and turn them into professional chefs. I didn't get a call back (as you can see since I'm still here writing ya'll) but it was a fun experience nonetheless! Check out the video below at the 1 min 20 sec mark plus about 5-10 seconds:


This week's baking adventure came from a recipe my mom found. She and my dad like to go up to north Georgia and visit with my godparents in the mountains from time to time. My mom gets the task of providing breakfast and horsderves when they go, but she's not much of a breakfast person, so when she came across this recipe, she asked me to try and make it on a trial run for the family first to see how it would turn out. For anyone who likes waffles and muffins, this is a must-try!


Waffle Muffins with Maple Sugar Glaze
[Let me know if you want the recipe and I'll send it to ya!]


First on the agenda was to gather the ingredients at the grocery store. There were a few things on the ingredients list that we didn't have in the house: malt powder, maple syrup (shocker, I know!... Don't judge us), and turbinado sugar. [What's turbinado sugar, you ask? WELL, have you heard of/seen "sugar in the raw"?... They're the exact same thing! Turbinado is just a fancy schmancy name for it!] Anyways, so apparently malt powder isn't a common ingredient people purchase anymore; it took me 30 minutes, 3 store workers, and 2 managers searching through Kroger to discover that they did not carry the stuff. Then I tried Target to no avail... BUT third time's the charm right?! RIGHT! Publix was my final stop before I decided to give up the search and not only did they have it but they had a couple different brand options as well! WOOHOO! Waffle Muffin-baking was back in business.

Back at the house, it was time for a little PREP action! All of the ingredients were placed on the counter and the eggs were separated. [Reference Baking Adventure #14 for tips on separating eggs]

This recipe was VERY simple to make. First, you combine the dry ingredients and sift/whisk together until blended. Then, melt the butter and....

BEEP BEEP BEEP

We interrupt this baking blog for a little Public Service Announcement... Do NOT, and I repeat do NOT place butter uncovered in the microwave while attempting to melt. You will have a geyser-like explosion and thus, a mess to cleanup. Please reference the below photo for evidence.


We now return you to your regularly scheduled baking adventure.


BEEP BEEP BEEP


Man, don't you hate it when that happens??? Those PSA people sure like to interrupt whenever they darn-well please. Anyways, where was I? Oh yea!...

Next up is to combine the wet ingredients together once the butter has time to cool a little. Remember, you don't want to curdle the eggs yolks, and if the butter is too hot, you'll have to start over. Once the wet and dry ingredients are in their respective bowls, it's time to combine the two just until incorporated. No need to over-mix or make smooth!

Set the batter bowl aside, and using a hand-mixer, beat the egg whites until medium peaks form.

Then, gently fold the egg whites into the waffle muffin batter until white streaks are all that you can see.

Next is time to fill the muffin cups! The recipe calls for mini-muffin pans and to grease the cups, BUT being the little rebel I am [insert snarky laughs here], I decided to use regular-sized muffin pans AND use muffin liners. Little tip: I've found that the liners help keep them fresh and moist longer!

After the muffin pans are filled with the batter, it's time to bake! The muffins baked for about 20 minutes and then were removed and glazed with the maple syrup and turbinado (raw) sugar.


Then they were popped back in the over for another 3-4 minutes until the glaze had time to set... and here you have the finished product!

Like I said, these Waffle Muffins were BEYOND simple to make. The most difficult part was locating Malt Powder at the grocery store....

"WAIT! Pint-Size Baker... you didn't tell us the most important part!" Oops, sorry. I'm guessing you're wanting to know how they tasted??? They were extremely moist, not overly sweet, and super delicious served warm with a little butter and extra maple syrup poured over top! Not the healthiest, but who cares? It's the weekend! :-)

That's it for this week's installment of the Pint-Size Baker's baking adventures! Hope you all had a great one!!! Until next time... muah!


Sunday, February 28, 2010

Baking Adventure #15


Happy [insert day you're visiting this blog post here]!!!

This weekend was a great one!!! It included celebrating my sister's birthday, some errand running, a little laundry (quite exhilarating), meeting up with a [relatively] new friend and...


wait for it...


wait for it...


BAKING!!!... WOOHOO! Didn't guess that was coming, did you?

This week's baking adventure came as a result of the request of multiple people over the last few weeks. However, the timing came about, as one of the requesters (my sister) has a birthday coming up and was craving something sweet [This NEVER happens]. Which leads us to this week's baking adventure...


GOOEY FUDGE BROWNIES


This week I decided to do something a little different and make a non-live, non-Ustream video so that I could take a stab my very FIRST [emphasizing this for a reason b/c if it's terrible, we can chalk it up to lack of experience] self-taught video editing. Please check out all 9 minutes and 59 seconds of Pint-Size baking glory and let me know what you think!


Alright, I know I promised to post the recipe here, but since I haven't quite gotten it perfected yet, it wouldn't be right to post it just yet. BUT I promise to post it in the near future! Just have to make a couple of alterations and adjust the cook time and we should be good to go!

In the meantime, here's a picture of the brownies 48 hrs after they were made...

[Or what was left of them anyway. Hehe]

Thanks again for watching!!! Until next time... Pint-Size Baker OUT!


Saturday, February 20, 2010

I Scream, You Scream, we all scream for Live Stream!

Happy Saturday!

In case you missed it, today was the second installment of the Pint-Size Baker streaming live!! [Insert applause and cheers here]

Most of you were likely out enjoying your wonderful Saturday afternoon (I don't blame you!), which is why I have posted below the video from earlier! On the menu today was Red Velvet Cupcakes (reference Baking Adventure #10) and they turned out way too delicious for my own good! Happy viewing and as always, please leave questions and comments! Hope to see you next time!


And the final product!!!...


Sunday, February 14, 2010

Baking Adventure #14

What a co-inky-dink!... this is baking adventure #14 and today is the 14th day of February! I promise that was not planned at all!

This week's baking adventure held true to the definition of "adventure". I had to cross the Atlantic Ocean for this one... A friend of mine was raised in Germany and has been craving a particular cake for quite some time now. He requested it back in the fall but it never actually happened for one reason or another. However, this week the craving finally became unbearable and he not only put in a "real" request but he also dropped by the CA$H for me to make it... making him my 3rd paying customer!!! YAHOO!!! Movin' on up!

Anyways, let's get down to it! This week's baking adventure is...


BIENENSTICH CAKE (Bee Sting Cake) <---- Please don't ask me how to pronounce it.


Luckily, since my friend requested this cake in the fall, I had already done a good bit of legwork trying to find the right recipe that held true to the German tradition while also being translated into English baking terms properly... this was a feat in itself! [Gotta love the metric system we Americans use. Nothing like being difficult.]

I searched long and hard across the internet and even consulted a former Project Manager from a previous job of mine, who was also from Germany. His recipe was half German and half English. I about went cross-eyed trying to figure it out... Finally, a few days ago I settled on this recipe for BIENENSTICH (Bee Sting Cake). It made the most sense and even the few steps left out I could figure out on my own.

Once I went to one of my favorite stores on earth, the grocery, it was time to PREP and then being baking.

This recipe involves three parts. The first of which is making the actual cake. This, my friends, was the easy part! You know, your usual separation of the dry and wet ingredients and then combine to make the batter.

The batter was a LOT thicker than I'm used to for typical cakes and only filled up about 2/3 of one round cake pan, so it made me quite nervous to bake. The recipe called for 3 tbsp of baking powder which meant that it was going to rise significantly... and rise it did! (Reference photo a little further down for this action!)

Before baking, the recipe called for making part two of the Bienenstich. Part two involved almonds (I used sliced instead of slivered. Makes for a prettier presentation.), sugar, cream, and butter. Once all of those ingredients were melted together, you're "supposed" to spread it on the top. However, I don't have a spring-form pan and had to improvise by placing the almond sugary goodness on the bottom of the pan and then the batter on top.

[If you look closely, you can kind of see the almond sugary goodness along the sides.]

[The cake literally looks like it was stung by a bee and then swelled up.]

While the cake baked and then cooled, it was time to venture into part three of the Bienenstich. This was by far the most cumbersome and difficult thing I've made so far in all of my baking adventures.

First, I had to separate the egg whites and egg yolks (not so difficult). I like to use the shell to help divide them. In order to do this, you crack the egg in half and open it over a bowl while holding the yolk in its shell. Then, you pour the yolk into the other shell you're holding back and forth until all of the egg white is in one bowl. Once done, put the left egg yolk in another bowl. [See below]


The next part of the recipe called for scalding milk (I used a microwave to do this! It took about 3 stints of 45 seconds each in the microwave to get it "scalding" hot. Not sure what scalding means? If you touch it with your finger and feel like your skin is going to burn off if you hold it in any longer than a split second, then that's scalding hot. REAL technical, I know. hehe)

After pouring the scalding hot milk into the egg yolk, sugar, and corn starch mixture while stirring constantly (READ: and getting milk everywhere b/c the mug holding the milk decided to have it pour down the side. NOT COOL), it was time for the double-boiler! What's a double-boiler you ask? Funny thing is I've never seen nor used a real one BUT! I do know how to make a makeshift one using a glass bowl and a pot of boiling water. [See below]

This next part was a PITA. (Want to know what that means? Feel free to comment and ask. It's an Ashley-ism is all I'm saying.) You have to stir constantly the egg yolk mixture while it sits over the double-boiler being careful not to let it boil until it thickens and becomes almost like a thick pudding. This definitely took about 15-20 minutes of stirring and then letting it sit on its own for a minute and then stirring profusely again.

EVENTUALLY, (if your hand doesn't fall off) you will get a texture and pudding like consistency as seen below.

After the thick almond cream is done. Remove from double-boiler (the recipe does not say to do this). Then, whisk the egg whites (sitting off to the side from the step above) until stiff peaks form. This will take about 5 minutes or so of beating on HIGH and a pinch of salt.

Next it was time to FOLD in the egg whites with the almond cream... I don't have a spatula so I used a plastic spoon. Make sure you don't over mix or else your stiff peaks will fall, and the final whipped almond cream won't be as stiff as it needs to (I did this and had cream EVERYWHERE when layering the cake).

After the cake cools and the almond whipped cream has time to set in the fridge, it's GO time! Cut the cake in half and then layer the cream in between and place the almond encrusted top back on... and you have a nice yummy BIENENSTICH Cake (Bee Sting Cake).


Delivery of this cake was a bit nerve-racking (insert: A LOT nerve-racking) as not only was it to be eaten by one TRUE German, but it turned out there were two additional ones awaiting the Bienenstich's arrival. They had me sit while they tasted it and the only negative feedback was that it needed "more cream"... aka "Ashley let the whipped cream set longer in the fridge or it all will come oozing out when layering on the cake".

That's it for this adventure! My hands are officially red and sore from all the egg whisking and stirring but it was more than worth it. That daggon' Bee had nothing on the Pint-Size Baker!

Hope ya'll have a very happy Valentine's Day whether you're spending it with a significant other or close friends and family! XOXO

Oh!!! Before I forget...

P.S. I made some of my "Sweet Ashley's (more addicting than crack) Choco Chip Cookies" for a Valentine's Day gift to my family. Too bad we can't eat with our eyes huh???