Buon giorno!
I know I haven't been baking much the past few weeks, but in all honesty, I'm saving up for the Christmas season. There will be quite a few new adventures: peppermint bark, red velvet cake, and cookies, just to name a few!
This week's baking adventure is inspired by the Christmas season. This is hands-down my most favorite time of year (see THIS for reiteration)! With Christmas comes the celebration of the birth of Christ our savior, in addition to parties, decorations, and wonderful times spent with family and friends. Atlanta is home to the magnificent Macy's tree, and one day I intend on getting to NYC to see the biggest one of all lit up during this season.
Before we get started, I do have a confession to make... this week's adventure involves no baking whatsoever... STOP! HOLD THE PHONE! Did she just say NO BAKING?... That I did folks. However, this little treat is so wonderful it is included by way of the "Wonderful Treat" loophole. SO, without further ado, this week's baking adventure is...
(Brought to you courtesy of Delish.com. One of my all-time favorite recipe sites!)
This recipe is just as the title says "SIMPLE". It involves a microwave, a cookie sheet, and a refrigerator. I KNOW those of you out there who aren't particularly blessed in the baking realm would be able to handle this without a doubt! (Mom, this includes you!)
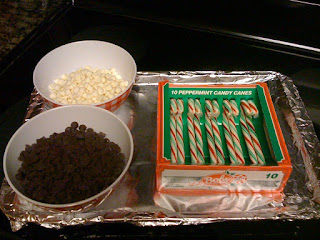
First things first: PREP! (Told you it was simple! hehe)

The recipe calls for crushed candy cane or peppermints. I went the candy cane route and chose a festive red and green peppermint candy cane to add a little more character. This recipe calls for 1/2 cup of crushed peppermint candy, which for me equated to about 6 full candy canes. Now, I don't own a mallet or any type of food beating device (otherwise known as a meat tenderizer), but I do own a rolling pin so it was time to go to town!

[Don't let the innocent face fool you. I'm full of strength and will crush a candy cane at moment's notice!]
Tip for crushing the candy cane: place in a plastic sealable bag prior to crushing (make sure you seal it), that way all crumbs and pieces are kept in one place as well as easily transferable to sprinkle on the chocolate.

After the candy canes are crushed into little bits and pieces, it's time to melt the chocolate in the microwave. Please note that while doing this, the bowl will get HOT and you will likely have a mess on your hands (literally).

I would recommend melting the semi-sweet chocolate first and then the white chocolate, as the white chocolate is a little finicky. Also, when melting the white chocolate, you might want to stir it a bit more than you did the semi-sweet chocolate as it wants to clump up... nothing a little stirring can't fix though!

After the chocolates are melted, it's time to spread the semi-sweet chocolate out on a foil lined cookie sheet and then drop tablespoons-full of white chocolate and marbleize...

This is where my lack of artistic ability comes in. To me the marbling of the chocolates looks like a big ole mess...

LUCKILY! The crushed candy cane comes in and saves the day by topping the chocolate and covering my imperfections! WOOHOO! [You're my hero! *sigh*]

After the Peppermint bark sets in the fridge for an hour, then the fun, breaking apart thing comes back to play!

And voila! There you have peppermint bark my friends! Simple, quick, and so easy, yet SO yummy! Store in an air-tight container up to a month in the fridge.
Hope everyone is having a wonderful Christmas season so far! I look forward to hearing from you soon! Until the next adventure...
Yours truly,
Pint-Size Baker


Hi Ashley thanks for the update.
ReplyDeleteThis looked fun to create, and delish too. I have never been to that website for recipes, I will check it out.
Thanks for including my fav in your line up. I had a great birthday.
So how does it feel to live alone? And where are you going to move to?
Thanks for the update! Can't wait for the next.
Merry Christmas!