Sunday, April 25, 2010

Baking Adventure #21

The weather in Atlanta lately has been amazing. Picture clear blue skies, a slight breeze, 78 degrees and sunshine from dawn until dusk. After all of the rain we had from fall through early spring, the nice weather has been a true blessing.

With that being said, we had a pretty gnarly storm come through and wash away all of the pollen late Friday night through late Saturday night. As a result, Saturday brought a day of errands and Lifetime movies on the couch (every girl loves to indulge in these from time to time, don't judge me). Since there was no avoiding the 100% chance of rain forecasted, an Avatar movie night was planned for the evening. Neither my friend nor I had seen it before and we decided to get creative and have a blue-theme to our snacks. He supplied blue corn tortilla chips and salsa, and I whipped up something yummy... *big surprise* Any excuse I can get to bake and be creative, I'll gladly take! What baked good went with the blue theme, you ask?


AVATAR BLUE(BERRY) CUPCAKES


Of course! I used a simple white cake mix purchased back in February at an Amish market in Ohio as my base. [This was cheating a little but I was baking at midnight Friday night, mind you, and felt like experimenting with additions and not the basic mix itself. Next time, the white cake will be derived from scratch as well.]

As part of my experimenting, I added fresh blueberries, a touch of lemon juice, and blue food coloring (to half of the cupcakes). Tip for folding in fresh blueberries: toss them in a little bit of flour to keep them from settling on the bottom of the batter prior to baking.

Once the batter was to my liking, I spooned it into the cupcake liners.

Then baked at 375 for approximately 15 minutes (or until the tops were firm) then let cool completely.

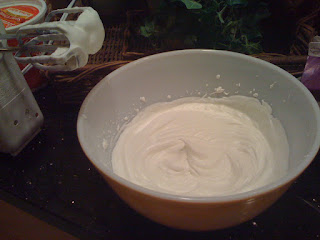
While the cupcakes were cooling, the experiment continued... Cream cheese frosting is my ABSOLUTE favorite of all the frostings, but I wanted this to also involve blueberries. So I made the frosting according to my usual recipe (cream cheese, butter, vanilla, and powdered sugar) then added the blueberries I had crushed... This sounds good in theory, no? Unfortunately, the resulting frosting was a bit runny (SERIOUSLY, runny frosting is becoming my arch-nemesis when it comes to baking!)... so I decided to wrap up the cupcakes and stick the frosting in the freezer overnight to firm up... Not the best idea. The next day (once the frosting thawed) it was back to its original consistency and just altogether not worthy of the "Pint-Size Baker" stamp of approval.

Thus, after a few choice words with myself [you know you talk to yourself too], I scraped the frosting off of the few cupcakes already frosted, dumped the entire bowl into the sink, and started over from scratch. Let me back up a little... after sticking the frosting in the freezer to set over night, I stayed up until 2am researching how to make frosting thicker. There aren't many tips for thickening cream cheese frosting; however, I did find a minor tweak suggestion and went to town on the new frosting and what do you know... IT WORKED! This batch ended up being my best yet in terms of consistency! Check out the final product below:


[Trying to improve my presentation skills... What do you think?]

And that's it for now folks! Baking Adventure #23 has already been determined but I need a #22 for next week. Please leave your recommendations in the comments section! I'll select one and bake it next week for you.


Friday, April 23, 2010

Baking Adventure #20

This post is going to be a little different than the norm, as baking adventure #20 was pretty much a failure both times I tried it.


Cinnamon Raisin Bread (minus the raisins)


My mom put in a special request for this a couple of weeks ago and I thought, "Sure! That should be easy. Afterall, I've made bread and cinnamon rolls before. What could be difficult about a little cinnamon bread minus the raisins?" WELL I am here to tell you that after two attempts at this pesky recipe, I have concluded two things: 1)Either my baking skills aren't what I thought they were or 2) This recipe is just plain incorrectly written (This is highly likely esp due to the fact that the recipe called for WAY too much salt to begin with. Who likes salty Cinnamon Raisin Bread? Not I!)...

[Reasons this failed: Bread never "rose" (Yes, my yeast was "alive") and it was too salty.]

Both options are entirely possible and while I have exhausted my attempts at this particular recipe I will NOT rest until I find another great cinnamon raisin bread recipe to try!

My sincerest apologies to those of you who have been checking in weekly if not more for the next baking adventure. You see, frustration gets the best of me sometimes and I wanted to remedy the errors of baking the bread before posting the recipe, so as to provide you with some great tips... Since that didn't happen, allow me to post a few pictures of something that DID turn out well:


DOUBLE-DECKER COOKIE CAKE!


For my friend Jason's birthday, he requested a cookie cake and stated that the frosting is the best part... so I took the idea and ran with it. Needless to say, there wasn't a crumb left upon leaving his celebration.


Note: If you would like me to make one of these for your birthday or any celebration, I would gladly oblige as new customers are always welcome!!! :-)

Wednesday, April 21, 2010

Oh where oh where can the Pint-Size Baker be?

Oh where or where can she be???

Sorry folks! I know I haven't blogged in a couple of weeks... I've still been baking and trying to conquer one particular recipe but it has given me so much trouble that I wanted to master it before blogging about it. Unfortunately, the mastering did not occur. *hmpf* [crosses arms and pokes bottom lip out]

Alas, there will be blogging to come in the next 24-48 hours though as I am in the process of finishing a double-decker chocolate chip cookie cake for a friends birthday!


STAY TUNED!

Monday, April 5, 2010

Baking Adventure #19

A day late posting this week's baking adventure but for good reason! Life has been INSANELY and AMAZINGLY busy the last week, so please excuse me if this post is misspelled (thank God for spellcheck), uses poor grammar, or is just plain bland. The recipe for this week's adventure was my grandmother's so I will try my best and do it good by providing an enthusiastic post!

This Easter season was filled with my confirmation into the Catholic church and great times with friends (new and old) and family, so it was only appropriate to celebrate the Easter holiday with a recipe from my grandmother, who is peacefully resting in heaven...


Strawberry Pie


If you notice from the specials in the produce section at the grocery, Strawberries, among other fruits, are very much in season right now! In fact, the grocery where I bought my ingredients for the recipe had 4 pints for $5! WOOHOO!

First things first: Prep...

[Insert picture that I forgot to take here. Please don't hate me. Mentally picture strawberries, strawberry gelatin, sugar, corn starch, and a Pillsbury pie shell (can't find a recipe that is better than premade).]

First, I baked the pie shell in the oven at 400 degrees for about 12 minutes like the pie shell packaging suggested. While it was cooling, I hauled and halved the strawberries...

Then layered them as neatly as possible into the baked pie shell.


Next, I combined the sugar, water, and corn starch in a pot over medium heat and stirred until thick. This took about 15-20 minutes of some TLC... TLC meaning stir and let sit for a minute or two, then stir and let sit again. Looking back, I probably should've let it get a little thicker, which is a takeaway for next time!

After the sugar starch was thick, I added the strawberry gelatin and red food coloring to make a gel and poured over the strawberries while still hot.


Another takeaway for next time: buy a DEEP DISH pie shell!!!... Strawberry goop kind of overflowed... and by kind of, I mean there was strawberry yumminess all over the counters! So much so that I had to place the pie on a pizza pan while it set in the fridge.


After the pie set for a few hours, I made some homemade whipped cream (*as grandma smiles down from heaven*) with heavy cream, powdered sugar, and a touch of vanilla!

Please note that homemade whipped cream doesn't save well, so prepare it right before serving. It was the perfect addition to an amazing Strawberry Pie! There are requests already to make it again soon. It's looking like a few great people at church are going to be getting this the next time as well!


[The pie crust was no match for the strawberries' strength but if you look hard enough you can find the little guy under there somewhere.]

Hope you all had an amazing Easter holiday and were able to celebrate with those near and dear to your heart!

Oh, before I forget! I made some cookies too as a "thank you" to some people at church for their amazing help and support throughout the RCIA process. Check out the little goodie bags:


Until next time my friends! Muah!